Start by doing your own research into some of the artists discussed above. Then, using slow shutter speeds, the multiple exposure function, or another technique inspired by the examples above, try to record the trace of movement within the frame. You can be as experimental as you like. Add a selection of shots together with relevant shooting data and a description of process (how you captured the shots) to your learning log.
Research
Robert Capa (B 1913-D 1954) was a Hungarian born war photographer and known for some of the greatest combat and adventure photographs in modern times. he was the only civilian on omaha beach (D-Day), his images were known as the ‘magnificent eleven’ that were captured on that day. He stated he captured 106 photos but only eleven survived and were published in Time magazine, June 19th 1944.
Capa shots from that day have a quality of movement that have a movie-like feel, perhaps from an old cine camera. They give a sense of the hectic chaos that these soldiers were walking into. They are exhilarating and terrifying at the same time to look at and give both a sense of the enormity and the individuality of the situation. There is an urgency to the images that comes from the subject matter and the scenario that Capa finds himself in.
Hiroshi Sugimoto (B 1948 is a Japanese photographer and spoken of his work as an expression of ‘time’ exposed serving as a time capsule for a series of events. In 1978 he photographed his series Theatres he started the exposure at the beginning of the movie, then stopping at the end of the movie. These feel like a nod to modern viewing habits of consuming films alone at home. They also give life to the thought of what happens when the film has finished at the cinema and the audience has left? He is also well known for his Seascapes photos which have a haunting, timeless look about them created by giving equal space to vast expanses of air and water seemingly frozen in time.
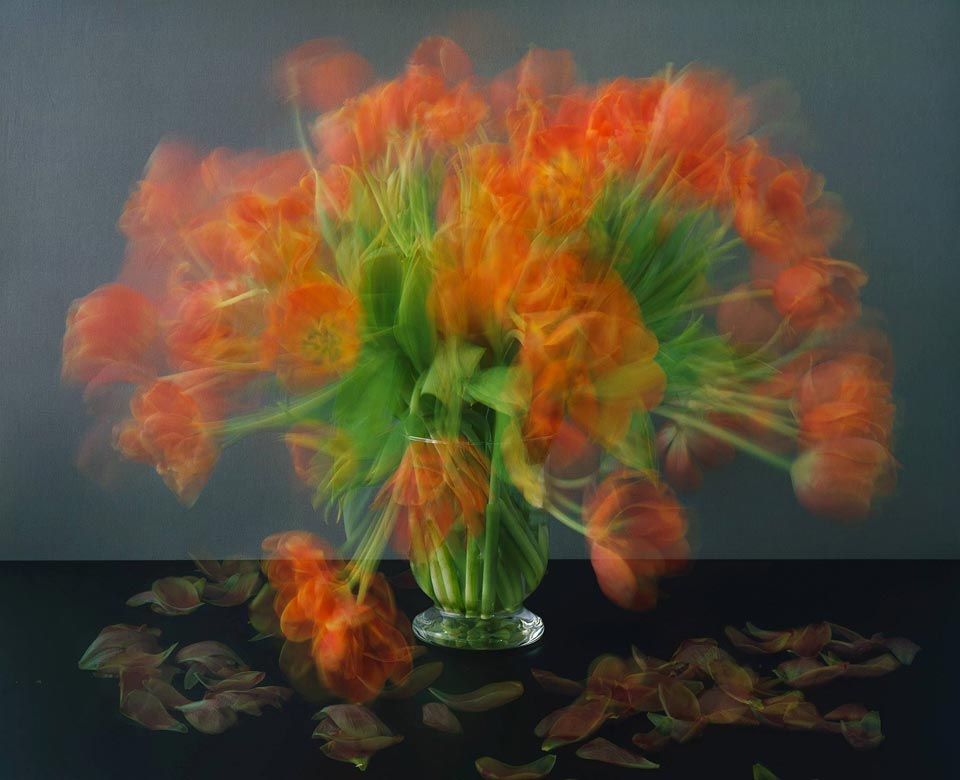
Michael Wesely B 1963 German born photographer known for very long-exposures of landscapes, cities and still life. His work is fascinating as his exposures can take up too 2 years to create a dream-like quality to them. Wesely has said “Time is more like the vehicle i use to arrive at images and photos. The extreme length of exposure leads to a shift in perception. It’s no longer the motif alone that counts—that is often a more invisible than visible, merely looming presence. But peripheral conditions such as light, movement, and other atmospheric elements emerge differently as focal points”
I am intrigued by the techniques used by Wesely and the technology used to achieve the ultra-long exposures over weeks/months/years. The images are effectively time-lapse films captured in a single frame.
Alexey Titarenko B 1962 While researching Michael Wesely I came across the work of Titarenko, a contemporary of Wesley. His long-exposure urban scenes depicting the hustle of Russian people going about their business and are meant to depict both present and past of 20th century Russians. The way his images are staged, to me, make them look etherial and look like a cloud, a fog passing through the scene.
I wanted to get some shots of good movement and the opportunity of the fair being in town was too good to miss. I could have gone down in the daylight, but the lights at night were too tempting.
It appears I took quite a few snaps! Not all are usable due to camera shake as they were all hand-held shots.
Having looked through the images I selected a few that I edited in RAW then brought into Photoshop.
Canon 450D EF-S 10-18mm f/4.5-5.6 f/14 ISO 100 0.8 secsCanon 450D EF-S 10-18mm f/4.5-5.6 f/4.5 ISO 100 1/4 secsCanon 450D EF-S 10-18mm f/4.5-5.6 f/4.5 ISO 100 1/4 secsCanon 450D EF-S 10-18mm f/4.5-5.6 f/14 ISO 100 0.8 secsCanon 450D 70-300mm f/22 ISO 100 0.8 secsCanon 450D EF-S 10-18mm f/4.5-5.6 f/16 ISO 100 0.8 secs
Reflection
Once I’d chosen my subject matter, this was an enjoyable shoot experimenting with slow shutter speeds. I also tried a little focus-pulling with the 1st and 4th images above with some success.
My favourites are the 2 images of the waltzers. The static foreground and the cars and their occupants in motion give a nice juxtaposition between the 2 elements. However, I think all of the images give a great sense of movement.
References
100 Photographs | The Most Influential Images of All Time. 2021. See The Story Behind One Of the Most Courageous Images In Photojournalism. [online] Available at: <http://100photos.time.com/photos/robert-capa-d-day> [Accessed 29 July 2021].
Start by doing some of your own research into the photographers discussed above. Then, using fast shutter speeds, try to isolate a frozen moment of time in a moving subject. Depending on the available light you may have to select a high ISO to avoid visible blur in the photograph. Add a selection of shots, together with relevant shooting data and a description of process (how you captured the images), to your learning log.
Primary Research
Joseph Nicéphore Niépce
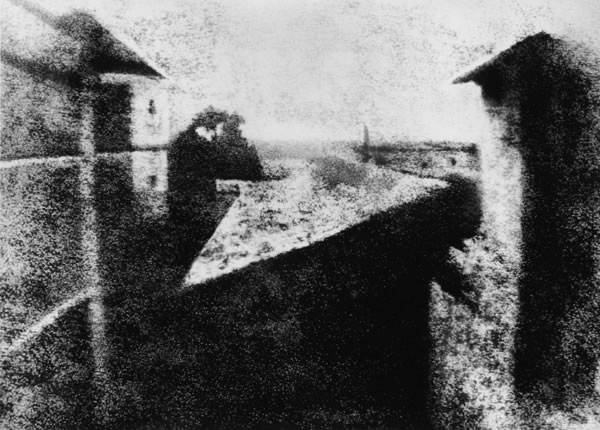
Joseph Nicéphore Niépce, – View from the Window at Le Gras, c. 1826 “The World’s First Photograph” Harry Ransom Humanities Research Center, The University of Texas at Austin
Long before the first public announcements of photographic processes in 1839, Joseph Nicéphore Niépce, a scientifically-minded gentleman living on his country estate near Chalon-sur-Saône, France, began experimenting with photography. Fascinated with the craze for the newly-invented art of lithography which swept over France in 1813, he began his initial experiments by 1816. Unable to draw well, Niépce first placed engravings, made transparent, onto stones coated with light-sensitive varnish of his own composition. These experiments, together with his application of the then-popular optical instrument, the camera obscura, would eventually lead him to the invention of the new medium.
In 1824 Niépce met with some degree of success in copying engravings, but it would be two years later before he utilized pewter plates as the support medium for the process. By the summer of that year, 1826, Niépce was ready. In the window of his upper-story workroom at his country house, Le Gras, he set up a camera obscura, placed within it a polished pewter plate coated with bitumen of Judea (an asphalt derivative of petroleum), and uncapped the lens. After a day-long exposure of eight hours, the plate was removed and the latent image of the view from the window was rendered visible by washing it with a mixture of oil of lavender and white petroleum, which dissolved away the parts of the bitumen that had not been hardened by light. The result was the permanent direct positive picture you see here—a one-of-a-kind photograph on pewter. It renders a view of the outbuildings, trees and landscape as seen from that upstairs window.
An ultimately doomed attempt to interest the Royal Society in his process—which he called “Heliography”—brought Niépce and the first photograph to England in 1827. Upon his return to France later that year, he left his precious artifact with his host, the British botanist Sir Francis Bauer, who dutifully recorded the inventor’s name and additional information on the paper backing of the frame that held the unique plate. Niépce formed a partnership with the French artist, Louis Jacques Mandé Daguerre, in 1829, but produced little more work and died, his contributions chiefly unrecognized, in 1833.
Louis Jacques Mandé Daguerre
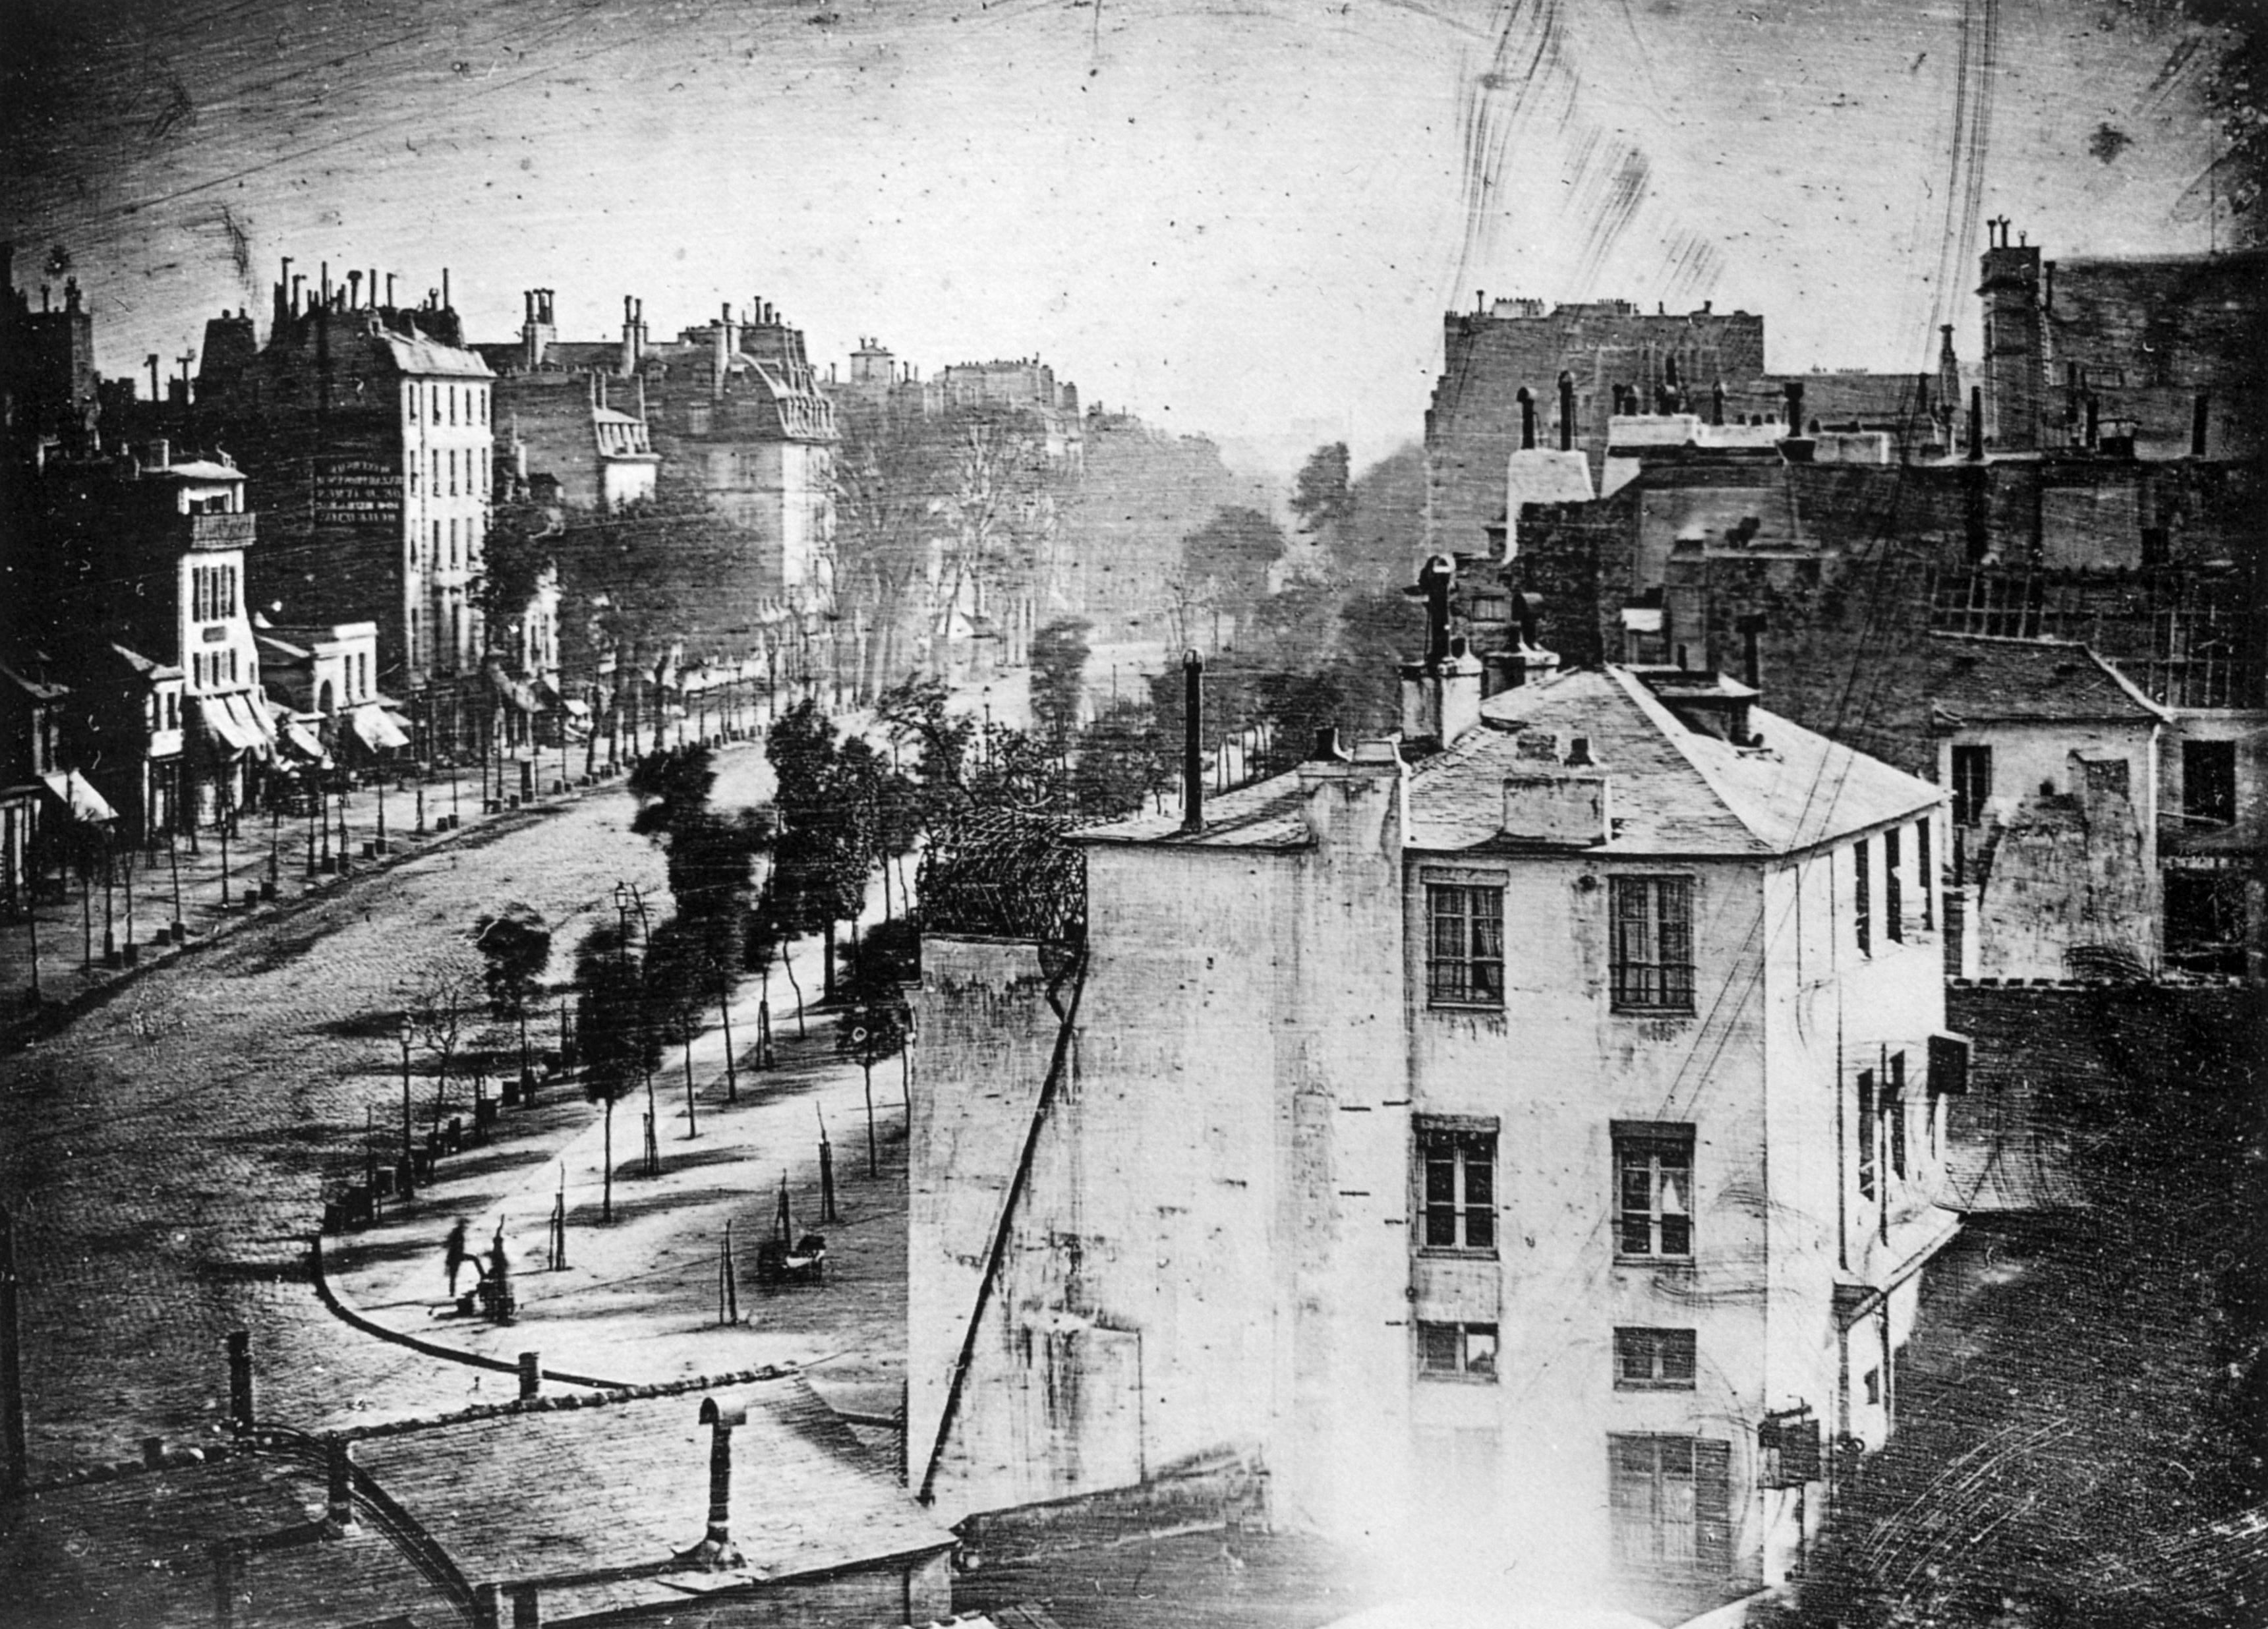
View of the Boulevard du Temple, taken by Daguerre in 1838 in Paris, includes the earliest known photograph of a person
In 1829, Daguerre formed a partnership with Nicéphore Niépce, who had been working on the problem of how to make a permanent image using light and chemistry—and who had achieved primitive but real results as early as 1826. By the time Niépce died in 1833, the partners had yet to come up with a practical, reliable process.
Daguerre’s process was revealed on August 19th 1839 and seemed magical. Each daguerreotype is a remarkably detailed, one-of-a-kind photographic image on a highly polished, silver-plated sheet of copper, sensitized with iodine vapors, exposed in a large box camera, developed in mercury fumes, and stabilized (or fixed) with salt water or “hypo” (sodium thiosulfate). Although Daguerre was required to reveal, demonstrate, and publish detailed instructions for the process, he wisely retained the patent on the equipment necessary to practice the new art. From its inset, photography had a dualism about it—as a medium of artistic expression and as a powerful scientific tool—and Daguerre embraced both.
Eadweard Muybridge
In 1878 Muybridge set out to answer the question “When a horse trots or gallops, does it ever become fully airborne?”. Muybridge developed a way to take photos with an exposure lasting a fraction of a second and, with reporters as witnesses, arranged 12 cameras along a track on Stanford’s estate. When the horse ran by it tripped wires connected to the cameras which produced a series of images that showed the horse completely off the ground. This led to the idea that photography could be used to capture truth through technology. Muybridge’s work was an early form of animation that led to the beginnings of the motion picture industry. Muybridge went on to capture more animals and people in his locomotion photos.
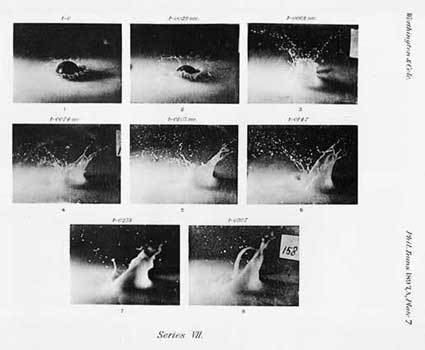
A M Worthington
“The splash of a drop is a transaction which is accomplished in the twinkle of an eye…”
Worthington’s experiments in trying to freeze an image in time using faster shutter speeds are most famously seen in his images of splashes in his fluid mechanics publication of 1908.
Harold Edgerton
Edgerton took the work of Worthington and refined it with his most famous work being that of a milk droplet splashing on to a gloss red plate.
Edgerton synchronized his electronic stroboscope with a special high-speed motion-picture-camera so that with each flash, exactly one frame of film was exposed. The number of flashes per second determined the number of pictures taken.
Motion pictures are normally exposed and projected at 24 frames per second, but when pictures are made at a higher rate and projected at normal speed, the apparent movement is slowed down. Edgerton designed high-speed motion-picture cameras that could expose as many as six thousand to fifteen thousand frames per second. When these films were projected at normal speed (24 frames per second), very high-speed events appeared – and could be studied – in extremely slow motion.
Edgerton’s splash work reminded me of the branding for Crown Paints, which obviously took its inspiration from it.
Philip-Lorca DiCorcia
DiCorcia’s ‘Heads’ is a collection of 17 images taken on the streets of New York in which the subjects were unaware that their photos were being taken. This form of street photography was taken in broad daylight which disguised the strobe lighting used to highlight the passers-by as they went about their daily business. The light was used to illuminate the most minute details of the subjects while the background fades away.
Controversially, one of diCorcia’s subjects sued the artist and his gallery for exhibiting, publishing, and profiting from his picture, arguing that it was taken without his permission and therefore violated his right to privacy (and his religious beliefs). DiCorcia countered that he did not seek consent because, “There is no way the images could have been made with the knowledge and cooperation of the subjects.” The artist ultimately won the case.
Shots
My initial thoughts were to do something with the children’s Lego, maybe dropping it from height and photographing it bouncing as it landed. This would require making noise, and being limited to evenings while the boys were asleep this would prove tricky.
So, plan B was to come back to the water experiments of Worthington and Edgerton. But how to capture an image that I could use with water in the limited free time I had.
As it was the hottest part of the year, the sprinkler was on the garden most evenings and wouldn’t take much to use this as it was the type of sprinkler that sends out pulses of water and I thought I would see if I could capture the individual pulses of water that weren’t normally clearly visible.
I took my camera and my 50mm prime lens and my 70-300mm zoom into the garden and tried my best to dodge the jets of water and take a good shot while keeping my camera dry.
I started with my 50mm and had the camera set to shutter priority with a high speed setting. I had to get quite close to the subject to get a shot. This was the result…
Canon EOS 450D EF50mm/f1.8 1/4000 sec f1.8 ISO 800
This was OK, but not what I had in mind. I wasn’t sure that the 50mm was the right lens for this. So I switched to my zoom.
This lens helped me keep out of the range of the sprinkler! It also gave me a wider field of view. I switched to manual focus here too as I felt it gave me better control over the focal point of the image I wanted to capture. With the high shutter speed, I also set the camera to burst mode to continually shoot when the shutter release is pressed.
I took quite a few shots, most of which weren’t of any use. However, there were a couple that I particularly liked which had some depth of field while focusing on the water pulse…
Canon EOS 450D 70-300mm 1/4000 sec f4.0 ISO 1600
This image was more like what I was looking for and it had captured drops of water in mid-flight with a shallow(ish) depth of field with the evening light glinting on the water pulse.
Close-up of the water drops
I had also captured another similar shot which I felt was better as the depth of field in the water was shallower…
Canon EOS 450D 70-300mm 1/4000 sec f4.0 ISO 800 Close-up of water drops
I feel that this is a stronger image than the first due to the water being clearer with more bokeh.
Reflection
Overall, I think I was initially overthinking this exercise. I think that keeping it simple with the sprinkler gave some good results and I was surprised with the amount of detail I could capture with the camera in-hand. Obviously with the shutter speed being so high, getting light through the lens by upping the ISO affects the clarity of the images when you zoom in or blow them up, so this would be a problem for large format reproduction.
Follow up
I decided to have another go in the garden for some movement capture. I decided to again focus on the front garden, but this time I chose a subject a little more natural – the plentiful supply of bees buzzing around the lavender. Due to their speed, trying to focus on a single bee would prove difficult! I decided to focus on the foliage and try to capture the bees when they were in the vicinity. I set the camera to burst setting with maximum shutter speed and largest ISO and went out to see what I could get. It took a lot of photos with the aim of capturing the bees with their wings frozen in time. This was harder than it looked down to the insect speed being greater than my ageing camera’s speed. However, I did manage to capture one successful image that froze a single bee in time with some amazing detail. After some editing in Lightroom to remove some of the graininess produced by the high ISO and some colour correction I was happy with the result.
Based on your work from the previous exercises, think about how your designs within the context of the book. For example, visually explore how your artwork sits within the format of your A5 pamphlet – how the page might frame the artwork, how different pages sit together or how you might begin to develop a narrative across multiple pages.
This process might suggest new ways of presenting or developing your work. Think about how you want to finish your artwork, whether this is through typography, illustration, photography, drawing or another format.
Critique your work – what has the format of the pamphlet offered you, how might your ideas develop further, and how has your understanding of creative book design changed through this exercise?
Production
As a designer, you need to have an understanding of the processes involved in creating a book. Some of these processes remain essentially the same as in early books, for example, folding paper to form pages and binding these together to form a spine. The spine, like our own backbone, is structurally significant in that it holds the pages of the book together and allows us to open and read the pages.
For the purposes of your first assignment, your book will be based on a simple, fanzine-like publication. For the production, you will need to consider how you print or reproduce your content, what sort of paper you can use, how you will bind it, and importantly, how many copies you will produce. Even with a very simple black and white photocopied publication, you will need to consider how your artwork, and the structure of your content fits, with this mode of production. In other words, what are the possibilities and limitations of photocopying, and how can your design approach and artwork accommodate these?
Previous exercises
Of the previous exercises I hadn’t thought about them appearing in the zine that is to be produced in the first assignment. Saying that, the piece I produced in the exercise ‘The Future Book’ lent itself to being a double page spread and would sit very well in a portrait zine. It could be used as a single page in a landscape version but I don’t think it would be very legible at that size. Also it would need to be printed in full colour as I’m not sure it would portray the same message or have the same impact in black and white.
The piece I did for the exercise ‘Research and development’ I’d always thought of it as a book cover. However, as a piece in a zine it begs the question whether to use the mockup or just the image? The type used in the exercise could be very impactful if repeated on other parts of the zine. Again, depending on the format of the zine the image could be used as part of an article or as an image in its own right or perhaps the background? This particular image would work well when reproduced in colour and black and white due to its bold, high contrast imagery and type. Or could the image be reproduced using coloured paper with the black and white image over the top?
Reflection
Prior to this exercise I had considered my work from the previous exercises a singular pieces of work, but this exercise has made me think more about how they could be used in the form of articles in a zine. Now I am viewing my work as a whole in the form of the zine for assignment 1. I think some of my work lends itself to being used as is in the zine while other pieces may work as images within an article. It’s also worth bearing in mind the bleed of the images as the reproduction methods may not be as accurate to full scale printing. This can all be explored in the development of the zine in assignment 1.
There are two elements to this exercise – thinking about how you produce your publication, and making a smaller scaled down version as a mock up.
Creating a small mock up
Printers use large sheets of paper to print multiple pages, which are then cut and folded. You’re going to use a simple A4 sheet to recreate the process of imposition and folding into ‘sections’ or signatures at a smaller scale.
Fold an A4 sheet of paper in half, to create an A5 sheet. Now fold it in half again, so that you have an A6 size. This will comprise four leaves and eight pages. A page has a recto (facing) side and a verso (back) side. The terms recto and verso are also used to describe right-hand and left-hand pages in a double-page spread. With the sheets still folded, number the pages as they would read, from page 1, the front, through to page 8, the back. Now unfold the pages and notice how the numbers are distributed on the outspread sheet. This is a very rudimentary form of imposition, but the principle is essentially a miniature version of the same process within print production. By refolding your A4 sheet and then cutting the folded edges, you create pages, which can be stitched or stapled at the centre (gutter) to form a rudimentary book.
Books are constructed from folded sheets in this way, each one of which creates a signature. A signature is a section made up from a folded sheet which will create pages when guillotined. Signatures are built up in 2, 4, 8, 16, 32, 64 or 128 pages then stacked up in sequence and glued or stitched (or both) across the back edge to form the book block, which is then bound to the cover.
Creating a full scale mockup
To create an A5 pamphlet with 16 pages take four A4 sheets together, and with the sheets positioned landscape, fold in half. Stitching or stapling on the fold will secure the sheets and form your publication.
Additional pages can be added, but there is a finite number that can be slotted together before you notice how the folded pages start to stick out from the non-folded edge. This can be remedied by trimming the edges of your pages. For professional book designers working on large publications, this process needs to be taken through binding choices, and carefully adjusting page designs across the whole document.
Number each of your sixteen pages from front to back cover. Unpack the document and notice how the relationship of the numbers on the front and back of each sheet. For example, 1 and 16 should be alongside each other, with 2 and 15 on the reverse. These numbers dictate where your content will go, and how this content needs to be printed, and are known as ‘printers pairs’.
Translating your DTP artwork, which has been produced in chronological order, 1-16, into the format needed to print your publication, is known as pagination. Commercially, printers often undertake this work, but as designers, it is also useful to understand how pagination works.
A simple way to approach this, is by taking the overall number of pages (often including the covers), and add one. So for your sixteen page booklet the magic number is 17. Go back to your mock up and add up your page numbers – each of your spreads should add to 17.
Critiquing and editing
Making decisions about which of your designs are the strongest is an important part of the creative process. Thinking about your designs within the context of a book can help spark new ideas, so the critiquing and editing of your work can initiate the start of a new creative process. With this in mind, don’t leave reviewing your work to the very end. It’s a good idea to test out your ideas within a book format as you go. This might mean seeing how your work is framed within a book’s borders, how content sits alongside each other on the spread of different pages, summarising your ideas down to essentials forms, or seeing how the turn of the page might start to build a narrative from one idea to the next.
Folding
In the previous module(GD Core Concepts) I had created a brochure for my final project. I created this in InDesign which lays out the document as spreads rather than it being paginated, but my visit to the printers had given me an insight into the preprint process of how PDFs pages rather than spreads are individually placed in their paginated format before printing. However, I didn’t fully understand this until I did this exercise which helped to illustrate the basics of page layout. It’s nice to also help familiarise myself with the terminology used in printing.
Small mockup
Full size mockup
Reflection
This exercise has given me a new perspective of thinking of a book as a whole and how it can be laid out as a whole document(book) as opposed to a series of separate pages which aren’t necessarily in the order you would think!
Firstly, review your visual ideas based on from the previous exercise through a process of critical evaluation. Which ideas are you drawn to? Which ideas have ‘legs’ – possible interesting outcomes which are worth pursuing? Often the ideas which are strongest are those which have depth, or many layers of association. Perhaps you are intuitively drawn to a particular idea. Select a few ideas you would like to push further. Use your learning log to record your thoughts.
Now, do you need to undertake any research to help move your selected ideas on? The form your research will take depends on the individual elements of your idea. Find source material that helps informs your ideas. For example, by doing objective drawings or taking photographs, to understand your subject better, and to consider aspects of composition. You can use both primary and secondary sources of research in this way. Research feeds into the development of your visual work, informing and advancing your ideas. Document this phase of the work accordingly.
The developing your ideas stage is about building on your initial ideas by reworking them, adding the visual or other insights gathered through your research, and testing out different versions or possibilities. Spend 45 minutes developing the possibilities of one of your ideas. How many different ways can you visualise this?
If you want to develop a broader range of ideas, then repeat the previous exercise to generate more possibilities, potentially using a different phrase as a starting point. Use your learning log to document this process of review, research and development.
Visualising your ideas is the culmination of all your preliminary work in which you work up some more developed visual sketches and ideas. This artwork can be hand-drawn illustrations, photographs, and/or include typography. The presentation can be a little rough around the edges but should show the main elements of your designs. Select the strongest variation of your ideas from the previous research and development exercise to start exploring how you can visualise them within a mock-up.
Use your learning log to document these research and development stages, and to reflect on the process and your results.
Review
Looking at the thumbnails and ideas from the last exercise and contrary to my initial thought “The oldest trick in the book” had, what I thought, generated to more interesting and less cliché ideas. I thought that the link between the word ‘trick’ and its link to the oldest profession. Whether this would be to red light or the more seedy side of the business, I need to do some more research into the subject and how the terms ‘oldest profession’ and ‘trick’ to generate some ideas and see whether an innocent take on the subject or more salubrious imagery would be best.
Research
I started with the phrase ‘oldest profession’ and tried to find its origin. I found that the phrase referring to prostitution is a recent one:
The oldest profession in the world (or the world’s oldest profession) is a phrase that, unless another meaning is specified, refers to prostitution. However, it did not acquire that meaning universally until after World War I. Formerly, various professions vied for the reputation of being the oldest.
This was a surprise to me as I assumed that the phrase had been around for a lot longer. However, this didn’t deter me from pursuing this course. The next logical step was to look at the actual history of prostitution.
Prostitution, the practice of engaging in relatively indiscriminate sexual activity, in general with someone who is not a spouse or a friend, in exchange for immediate payment in money or other valuables. Prostitutes may be female or male or transgender, and prostitution may entail heterosexual or homosexual activity, but historically most prostitutes have been women and most clients men.
While the moniker ‘Red Light District’ is most readily associated with Amsterdam, historically the term refers to any city district known for being a den of vice. ‘Red Light District’ became shorthand for areas with high concentrations of sex workers in the 19th century when brothel-owners began to use red gas lights to discreetly alert potential customers to the true nature of their business.
The search for imagery took me in various directions from the red light itself to imagery of prostitutes. But the most interesting images I found were images of calling cards in phone boxes. These reminded me of the fanzines in their hand drawn and low quality production.
Developing ideas
From my research a few things caught my eye. Some of the images on my Pinterest board looked promising. However, I didn’t have any idea of how to use them! I also wanted to keep the red light in there somewhere too, whether that be the colour or using the lamp imagery. Images that stood out to me from my research were:
I went back to Procreate…
Of these ideas I liked the imagery of the prostitute with the eyes blacked out, the calling cards and the prostitute being picked up by a car. I wasn’t sure which to use so I thought I would try and combine them. I moved into Photoshop to see what I could do.
Visualizing ideas
The first thing I wanted to do was to try and recreate the halftone effect of one of the images I had found on Pinterest. I used an image of a man picking up a prostitute in his car and changed the image mode to bitmap and played with the settings until I was satisfied with the result. I then recreated another element from my research and blacked-out the eyes of both figures.
It then needed some colour. I added a pink/red background colour, but the image wasn’t as clear with the background colour. So I added a white box behind the halftone image but in front of the background.
I liked the way this was looking. It had that fanzine/homemade feel. I now needed some type.
I have recently been following an artist called Roy Cranston. He uses a lot of experimental typography which looks irregular and distinctive and I thought it would would work well for this cover.
The shadows of the car in the image gave a great vertical axis to work with which I lined up with the black box covering the woman’s eyes.
I added the title of the book in good old Helvetica in different weights and sizes and also distorted it by duplicating parts of the type using the marquee tool and offsetting them.
With the type added, the design looked a little unbalanced so I decided to add some more black bars. I aligned these these with the text and the original black bars.
At this point I was happy with the way it was looking apart from the flat pink/red areas. Initially I put a picture of red light district windows behind but I didn’t like it. I then tried it with the calling card collage behind and that was the one.
I was really happy with the design and decided to ask for feedback from my peers. The feedback was mostly positive with only one concern about the word ‘book’ being too close to the bottom of the page when it came to printing.
I went on to mock it up as a book cover.
Conclusion
I am surprised where this exercise took me. I initially wasn’t that taken with this exercise and found it hard to get going. However, once I had some inspiration and imagery to work from I enjoyed it and I hope that this shows in the final piece.
So, after years of writing off the possibility of returning to graphic design I now find myself in a position to do so after a 25 year “break”. After working my way up the catering ladder in kitchens in the south-west and London, the arrival of my twin boys made me re-evaluate what I wanted out of life which didn’t include working in hot, sweaty kitchens evenings and weekends! I still needed a creative outlet and it was obvious to all around me that I needed to do something about it. I had also come to the same conclusion and began researching any possible way that I could complete my graphic design training and prove to myself that it is what I should have been doing all along while still holding down a job and bringing up a young family. I found a few choices of part-time online course providers and whittled it down to the OCA. I also found out that I could fund my studies with student finance which helped alleviate the financial worries of becoming a student again. With the full support of my wife and friends I decided to take the leap into the unknown which is why I am here now, a little excited and daunted by what lies ahead.


 So, after years of writing off the possibility of returning to graphic design I now find myself in a position to do so after a 25 year “break”. After working my way up the catering ladder in kitchens in the south-west and London, the arrival of my twin boys made me re-evaluate what I wanted out of life which didn’t include working in hot, sweaty kitchens evenings and weekends! I still needed a creative outlet and it was obvious to all around me that I needed to do something about it. I had also come to the same conclusion and began researching any possible way that I could complete my graphic design training and prove to myself that it is what I should have been doing all along while still holding down a job and bringing up a young family. I found a few choices of part-time online course providers and whittled it down to the OCA. I also found out that I could fund my studies with student finance which helped alleviate the financial worries of becoming a student again. With the full support of my wife and friends I decided to take the leap into the unknown which is why I am here now, a little excited and daunted by what lies ahead.