‘When somebody sees something and experiences it – that’s when art happens’
(Hans-Peter Feldman)
If photography is an event then looking at photography should also be an event. Look again at Henri Cartier-Bresson’s photograph Behind the Gare Saint-Lazare in Part Three. (If you can get to the Victoria & Albert Museum in London you can see an original print on permanent display in the Photography Gallery.) Is there a single element in the image that you could say is the pivotal ‘point’ to which the eye returns again and again? What information does this ‘point’ contain? Remember that a point is not a shape. It may be a place, or even a ‘discontinuity’ – a gap. The most important thing though is not to try to guess the ‘right answer’ but to make a creative response, to articulate your ‘personal voice’.
Include a short response to Behind the Gare Saint-Lazare in your learning log. You can be as imaginative as you like. In order to contextualise your discussion, you might want to include one or two of your own shots, and you may wish to refer to Rinko Kawauchi’s photograph mentioned above or the Theatres series by Hiroshi Sugimoto discussed in Part Three. Write about 300 words.
Exemplar:
John Adrian Orr: https://johnaorroca.wordpress.com/category/coursework/part-5/ Hans-Peter Feldman: www.youtube.com/watch?v=mPPhiSgv5fw [accessed 25/01/18]
Response
Behind the Gare Saint-Lazare is the most well-known photo byHenri Cartier-Bresson. It is said to be a masterpiece in timing and form. Just using his 35mm camera, all the stars aligned for a split second and he was rewarded with this photo.
The shot of a man jumping/hopping before touching the water looks, at first glance, as a quickly taken snapshot but due to the timing and composition there is a lot more is going on in the photo. Modern cameras make this much easier to capture than what Henri Cartier-Bresson had available to him. A small Leica which enabled faster photos compared to the bigger cameras that needed tripods especially the year it was captured (1932) was still nothing compared to modern DSLR cameras that can take several frames per second. This was a single shot with a film camera.
Composition with the man leaping made stronger by the silhouette against the white background is what stands out at first glance then looking closer you can see a dancer on the poster on the wall with the stance almost echoing each other. What makes the photo even more special is it was basically captured through a fence, a spontaneous shot that was going to become known as “the decisive moment” with photographers for decades-to-come being inspired. The setting of the train station of Saint-Lazare a perfect place to capture a busy, bustling shot with a hint of luck.
Horizontal and vertical lines are a strong point from the ladder in the foreground to the verticals of the fence and buildings in the background, figures almost standing still while the main subject creates a sense of speed, then the eyes follows a zig-zag pattern from the horizontal fences down to the ladder in then to man jumping, plus the reflection then emphasises the man in motion with the large amount of whitespace around it.
Use your camera as a measuring device. This doesn’t refer to the distance scale on the focus ring. Rather, find a subject that you have an empathy with and take a sequence of shots to ‘explore the distance between you’. Add the sequence to your learning log, indicating which is your ‘select’ – your best shot.
When you review the set to decide upon a ‘select’, don’t evaluate the shots just according to the idea you had when you took the photographs; instead evaluate it by what you discover within the frame (you’ve already done this in Exercise 1.4). In other words, be open to the unexpected. In conversation with the author, the photographer Alexia Clorinda expressed this idea in the following way:
Look critically at the work you did by including what you didn’t mean to do. Include the mistake, or your unconscious, or whatever you want to call it, and analyse it not from the point of view ofyour intention, but because it is there.
I was listening to the radio and the discussion was around the similarities between certain creatures and human beings. There was also the fact that humans share 60% of their DNA with bananas!
However, shots of bananas didn’t inspire me. But we do have a local zoo, and I thought that I could visit there to see some of the monkeys and apes that we are more closely related to.
The idea that the apes and monkeys were are closet genetic relatives and yet were so different gave me a starting point for this exercise. There was also the point of them being in captivity, in relation to this exercise, and were there for me to observe and not in the wild which made the distance between us even greater.
Visiting Paignton Zoo in the winter months does however bring more challenges than I thought, from booking a slot due to Covid to half of the zoo being closed for maintenance during the off-season. This meant that the Great Apes (gorillas and orang-utans) weren’t accessible and the majority of the other monkey species were inside keeping warm. So…plan B!
There were still some of the more hardy animals out and about in the zoo, so the distance between myself and my subject might have to be a bit greater than initially thought.
I had a relatively unsuccessful time at the zoo, from the large number of out of focus shots or shots where the shutter speed was too slow, I had managed to get a handful a decent clear shots.
The Maned Wolves were a bit reluctant to come out in the cold!
The most cooperative animals by far were the cheetahs, who seemed to be very curious of what I was up to and this gave me the chance to take some clear shots of them.
Canon EOS 450D 70-300mm ISO 100 f/5.6 1/60 secsCanon EOS 450D 70-300mm ISO 100 f/4.5 1/125 secsCanon EOS 450D 70-300mm ISO 100 f/5.6 1/60 secsCats are more like us than you’d think. A 2007 study found that about 90% of the genes in the Abyssinian domestic cat are similar to humans.
My ‘Select’
Of the images of the cheetahs this is my select. The cheetah is looking straight at the camera which begs the question of who is studying who? Am I a curiosity or the next meal? Are we really that different? Does that 10% DNA make a difference? Is the distance that great? How has that made us the dominant species?
Select an image by any photographer of your choice and take a photograph in response to it. You can respond in any way you like to the whole image or to just a part of it, but you must make explicit in your notes what it is that you’re responding to. Is it a stylistic device such as John Davies’ high viewpoint, or Chris Steele Perkins’ juxtapositions? Is it an idea, such as the decisive moment? Is it an approach, such as intention – creating a fully authored image rather than discovering the world through the viewfinder?
Add the original photograph together with your response to your learning log. Which of the three types of information discussed by Barrett provides the context in this case? Take your time over writing your response because you’ll submit the relevant part of your learning log as part of Assignment Five.
A photograph inspired by another is called ‘homage’ (pronounced the French or English way). This is not the same as Picasso’s famous statement that ‘good artists borrow, great artists steal’; the point of the homage must be apparent within the photograph. It’s also not the same as ‘appropriation’ which re-contextualises its subject to create something new, often in an ironic or humorous way. Instead, the homage should share some deep empathy or kinship with the original work. An example is Victor Burgin’s series The Office at Night (1986), based on Edward Hopper’s famous painting of the same name:
‘The hackneyed idea of ‘influence’ is not at issue here. I am not interested in the question of what one artist may or may not have taken from another. I am referring to the universally familiar phenomenon of looking at one image and having another image spontaneously come to mind.’
You may already have taken some homage photography where you’ve not tried to hide the original inspiration but rather celebrated it. Refer back to your personal archive and add one or two to your learning log together with a short caption to provide a context for the shot.
Stumble…
While looking at various different photographers for some inspiration for my homage I stumbled upon an image allegedly by Ansel Adams that resonated with me.
The photograph is of a pine tree on Sentinel Rock in Yosemite National Park. It is claimed to be an early work by Adams but this is still to be proven (see the article below).
This image reminded me of the trees that can be seen all across the windswept hills of Dartmoor which is right on my doorstep. I decided to take a trudge across the moor to see what I could do with a similar subject matter. I found a tree atop Elmsworthy Tor, near Haytor, which was suitably windswept and perched on its own on the rocky outcrop.
I then selected a couple of images and tweaked in Lightroom.Canon EOS 450D EF-S 10-18mm ISO 100 f/8.0 1/800 secCanon EOS 450D EF-S 10-18mm ISO 100 f/8.0 1/250 sec
Reflection
I really enjoyed this exercise. I think this has to do with the subject matter resonating with me. As a result I’m very happy with the 2 images I ended up with. Both images are of the same tree, on the same day and yet have 2 completely different feels. The first is stark and dramatic and gives the bleak feel of being up on the moors, and the second shows the colours of the moors which are rich and vibrant even on a windy winter’s day in December. I’m unable to decide which one I prefer as they both have their qualities, but I think the first is more representative of the original image which inspired them.
Make a Google Images search for ‘landscape’, ‘portrait’, or any ordinary subject such as ‘apple’ or ‘sunset’. Add a screengrab of a representative page to your learning log and note down the similarities you find between the images.
Now take a number of your own photographs of the same subject, paying special attention to the ‘Creativity’ criteria at the end of Part One. You might like to make the subject appear ‘incidental’, for instance by using focus or framing. Or you might begin with the observation of Ernst Haas, or the ‘camera vision’ of Bill Brandt. Or if you’re feeling bold you might forget about your camera completely and think about the tricky question of originality in a different way – http://penelopeumbrico.net/index.php/project/suns/
Add a final image to your learning log, together with a selection of preparatory shots. In your notes describe how your photograph or representation differs from your Google Images source images of the same subject.
For this exercise, as we are looking at light, I chose a lighthouse for my subject matter. The lighthouse in question is the Lizard Point lighthouse in Cornwall.
The images on the Google search threw up lots of images of the actual lens with varying qualities of light, some warm and some cold, some natural and some artificial light, and some in daylight and some in darkness. Quite a lot of them are are taken with a wide-angle or fish-eye lens to emphasise the curvature of the lighthouse itself.
The day of my shots the light was very flat and didn’t lend itself to some interesting colours even refracted in the lighthouse lens. So, in contrast to the majority of the Google images, which were full colour, I decided to use the a framed image of the lens with the sea in the background in black and white and let the contrast of the subject matter to depict the different types of light coming through both the lens and window – the soft, moody sky and the sharp, focussed light of the lens.
Canon EOS 450D EFS 10-18mm ISO 100 17mm f/11 1/50 sec
Use a combination of quality, contrast, direction and colour to light an object in order to reveal its form. For this exercise, we recommend that you choose a natural or organic object such as an egg or stone rather than a man-made object. Man-made or cultural artefacts can be fascinating to light but they’re already authored to some degree, which requires interpretation by the photographer; this exercise is just about controlling the light to reveal form.
You don’t need a studio light for this exercise; a desk lamp or even window light will be fine, although a camera flash that you can use remotely is a useful tool. The only proviso is that you can control the way the light falls on the subject.
Take some time to set up the shot. If you’re shooting an egg, you should think about emptying it first so that it will stand up. This is really a topic for advanced students at Level 3 but you may get some help from Google. The background for your subject will be crucial. For a smallish object, you can tape a large sheet of paper or card to the wall as an ‘infinity curve’ which you can mask off from the main light source by pieces of card. You don’t need to use a curve if you can manage the ‘horizon line’ effectively – the line where the surface meets background. Taking a high viewpoint will make the surface the background, in which case the surface you choose will be important to the shot.
Exposure times will be much longer than you’re used to (unless you’re using flash) and metering and focusing will be challenging. The key to success is to keep it simple. The important thing is to aim for four or five unique shots – either change the viewpoint, the subject or the lighting for each shot.
Add the sequence to your learning log. Draw a simple lighting diagram for each of your shots showing the position of the camera, the subject and the direction of the key light and fill. Don’t labour the diagrams; quick sketches with notes will be just as useful as perfect graphics.
Canon EOS 450D EF50mm ISO 100 f/8 1/8 secLow angle of light from the right hand sideCanon EOS 450D EF50mm ISO 100 f/8 1/30 secLight from above and slightly behindCanon EOS 450D EF50mm ISO 100 f/4 1/20 secLow light from behind and to the rightCanon EOS 450D EF50mm ISO 100 f/4 1/40 secLight from directly behind
Reflection
This exercise reminded me of the fruit close-ups I had done earlier. This time however, Had more of an understanding of light and how it interacts with the subject and how it can change the look and feel of it. I enjoyed playing around with angles of light and shot which helped me be more decisive with my light positioning and use it in a more playful way.
Capture ‘the beauty of artificial light’ in a short sequence of shots (‘beauty’ is, of course, a subjective term). The correct white balance setting will be important; this can get tricky – but interesting – if there are mixed light sources of different colour temperatures in the same shot. You can shoot indoors or outside and the light can be ambient or handheld flash.
Add the sequence to your learning log. In your notes try to describe the difference in the quality of light from the daylight shots in Exercise 4.1.
The major advantage of artificial light sources over natural light is that you have them fully under your control. There are many tools for changing their characteristics. Artificial light lets you photograph topics that would be impossible to handle under natural light.
The artificial light sources typically used in photography are constant lights (lamps, daytime permanent photographic lights, hand lamps, etc.) and flashes (studio flash generators and flash guns). Taking pictures with a constant light source is similar to taking pictures with natural light; the main difference lies in the fact that you have many more ways to influence the characteristics of that light.
Taking pictures with flashes works differently than taking pictures with a constant light source.Flashes let you produce several effects that you can’t achieve in constant light. Above all there’s the ability to “freeze” motion and to create various motion studies with help from a flash’s strobe mode.
The Characteristics of Artificial Light
While your options for influencing natural light’s properties are very limited and to a large degree you just have to adapt to the light, for artificial light sources, there are almost endless ways to affect its properties.
Light Intensity
For artificial light, you have two basic paths for how to adjust the intensity of the artificial light source directly:
Setting Light Intensity
The Light’s Distance
The first path is to set the light’s intensity right at its source. For permanent sources, you can do this for example by choosing the outputs of the bulbs, and for studio flashes and flash guns, by directly choosing their output.
The other way to influence light intensity is through your choice of how far the light is from the scene.
Light Quality
Light quality entirely depends on the relative size of your light source. When using artificial light sources, you have many ways available to control this relative size. The light source itself has a certain absolute size, a light bulb would be a very small light source in a given situation, a large LED panel would be a large light source in that same situation.
Light Color
The color of a flash is usually balanced to match daylight. Among permanent lights, you’ll encounter classical incandescents with their warm (orange) hue, and fluorescents (with a green hue). But today ordinary fluorescents and compact fluorescents are both available in daylight versions. Modern LED panels are also balanced for daylight.
Light Direction
While sunlight’s direction depends on the time of the year and day, for an artificial light source, you can choose its direction precisely to fit your photographic goals.
Night Photography
Taking photos at night might seem counterintuitive to most people, because at first glance… there’s not much to see. Photography is a form of art with light as its foundation – whether it’s film or digital, light is needed to create a photograph. Artificial light provides us with a source of light that’s adjustable and diverse in its applications. Finding artificial light is easy for those who live in large urban areas, but for those who live more rurally artificial light is less abundant.
Out and about…
I went for a wander after dark with my camera and my trusty 50mm lens to get some shots of how artificial light is used to highlight the night and how it is used for the mundane things that we take for granted whether it was the cold utilitarian lighting or the more inviting, warmer light used to welcome visitors.
Canon EOS 450D EF 50mm/f1.8 ISO 1600 f/11 1/10 secCanon EOS 450D EF 50mm/f1.8 ISO 1600 f/1.8 1/40 secCanon EOS 450D EF 50mm/f1.8 ISO 1600 f/1.8 1/15 secCanon EOS 450D EF 50mm/f1.8 ISO 1600 f/11 1/8 secCanon EOS 450D EF 50mm/f1.8 ISO 1600 f/11 1/5 secCanon EOS 450D EF 50mm/f1.8 ISO 1600 f/1.8 1/15 secCanon EOS 450D EF 50mm/f1.8 ISO 1600 f/11 1/8 sec
Reflection
Artificial light is a lot easier to control than natural light. Depending on the type of light used dictates the feel of the image. Whether it’s flat or directional; warm or cold; coming from a single source or multiple angles, light can affect the feel and tone of an image.
With my images I was only using a hand held camera with the ISO cranked right up to compensate for the shutter speed needed. In future, if I need more night shots, I will use a tripod and longer exposure times so that the ISO can be reduced and image clarity can be improved. However, the grainy look of some of the shots give them a retro street photography vibe.
Taking the photography of Mann, Atget or Schmidt or a photographer of your own choosing as your starting point, shoot a number of photographs exploring the quality of natural light. The exercise should be done in manual mode and the important thing is to observe the light, not just photograph it. In your learning log, and using the descriptions above as your starting point, try to describe the quality of the light in your photographs in own words.
Research
In the book ‘The Art of Photography’ light is described as the ‘central issue’ of photography. The term photography was first coined in 1839 by William Henry Fox Talbot and was an amalgamation of the Greek words ‘photo’ meaning light, and ‘graphy’ meaning to draw. Therefore photography was viewed as ‘drawing with light’.
Outdoor lighting, sunny weather provides directional light, as do dawn and dusk (The Golden Hour) light from the East or West. However, there is a difference between sunlight and dawn or dusk light, both are devoid of the deep shadows associated with sunlight. Overcast light provides flat, non-directional light. But some cloud cover can provide enough directional light to give some shadow depth. When photographing in daylight it is worth assessing the current lighting conditions versus other possibilities in order to envisage the same situation under alternate conditions.
I googled all three of the artsists mentioned above to see which images stood out. By doing this, I was drawn towards Eugène Atget, as his work contains a variety of approaches as mentioned in the EYV coursebook; ‘He usually made such images – see, for example, Environs, Amiens – in the middle of the day, when shadows were minimal. Atget’s late photographs, however, are frequently marked by subjective light and deep shadows’.
Atget was a French photographer who is well known for his imagery of the architecture and streets within Paris. Keeping the idea of outdoor photography in mind, I took the opportunity to complete the exercise while out walking the dog around the woods using my 50mm lens as the dog wouldn’t hang around while I set up a shot! Atget’s works included nature and trees and the image I was particularly drawn to was the one below.
Saint-Cloud, Tree Roots, Saint Cloud Park (Atget, 1906)
Atget used a lot of diffused light, in turn capturing a clear and detailed composition. He also made some shots that included heavy shadows or highlights to provide depth and show silhouettes of the surroundings or subjects. I liked the idea of the exaggerated depth of his photos and tried to emulate it in mine.
The following photos were taken on probably the last sunny day of autumn when the light was still warm but the sun was low in the sky with the camera set to manual.
Canon EOS 450D EF50mm f/1.8 f/3.5 1/80 ISO 400Canon EOS 450D EF50mm f/1.8 f/3.5 1/640 ISO 400Canon EOS 450D EF50mm f/1.8 f/3.5 1/250 ISO 400Canon EOS 450D EF50mm f/1.8 f/3.5 1/4000 ISO 400Canon EOS 450D EF50mm f/1.8 f/3.5 1/800 ISO 400Canon EOS 450D EF50mm f/1.8 f/3.5 1/800 ISO 400Canon EOS 450D EF50mm f/1.8 f/3.5 1/200 ISO 400Canon EOS 450D EF50mm f/1.8 f/3.5 1/40 ISO 400Canon EOS 450D EF50mm f/1.8 f/3.5 1/4000 ISO 400Canon EOS 450D EF50mm f/1.8 f/3.5 1/200 ISO 400Canon EOS 450D EF50mm f/1.8 f/3.5 1/125 ISO 400
Reflection
Natural Light has colour depending on the time of the day-warm at sunrise/sunset, blue during the day, neutral in the absence of sun or when overcast
Light can be used to convey an atmosphere or emotion
One can creatively change the mood of photograph depending on the exposure combination of iso, aperture and shutter speed
Over-cast days or when the light is neutral is best for recording and documenting a scene i.e. doesn’t have mood or emotion to detract from the scene
Different types of light add to the creative pallet of a photgrapherer
Properties of light include, quantity, quality, direction, reflection/refraction.
‘If you are not willing to see more than is visible, you won’t see anything’
Ruth Bernhard (1902-2006)
Alberto Giacometti had already mastered the art of drawing when he discovered the problem of seeing both the whole figure and the detail simultaneously. When he concentrated on the whole, the details disappeared and conversely, the whole disappeared when detail took over. He didn’t know how to draw without compromising one or the other. The only reasonable solution was to let the brain choose the right movement without concentration.
Find a good viewpoint, perhaps fairly high up (an upstairs window might do) where you can see a wide view or panorama. Start by looking at the things closest to you in the foreground. Then pay attention to the details in the middle distance and then the things towards the horizon. Now try and see the whole view together, from the foreground to horizon (you can move your eyes). Include the sky in your observation and try to see the whole visual field together, all in movement. When you’ve got it, raise your camera and release the shutter. Add the picture and a description of the process to your learning log.
My images
Canon EOS 450D EF-S10-18mm ISO 100 f/4.5 1/200 secsCanon EOS 450D EF-S10-18mm ISO 100 f/11 1/80 secsCanon EOS 450D EF-S10-18mm ISO 100 f/4.5 1/4000 secsCanon EOS 450D EF-S10-18mm ISO 100 f/4.5 1/1600 secs
While on holiday in Cornwall, I spent some time wandering around the very busy Kynanace Cove. It was hard to find a quiet spot to take some photos but there were some relatively unpopulated vistas. Using my camera and wide-angle lens I took some images with this exercise in mind which incorporated details of the foreground, mid ground and distance including the skyline. The inclusion of all these elements give the images a sense of scale as well as the added interest of all the different elements from small to large.
Reflection
I personally like the first image best, however, the second image is probably the clearest image due to using more suitable settings on the camera giving the image a better overall clarity even if it isn’t the best composition.
Start by doing some of your own research into the photographers discussed above. Then, using fast shutter speeds, try to isolate a frozen moment of time in a moving subject. Depending on the available light you may have to select a high ISO to avoid visible blur in the photograph. Add a selection of shots, together with relevant shooting data and a description of process (how you captured the images), to your learning log.
Primary Research
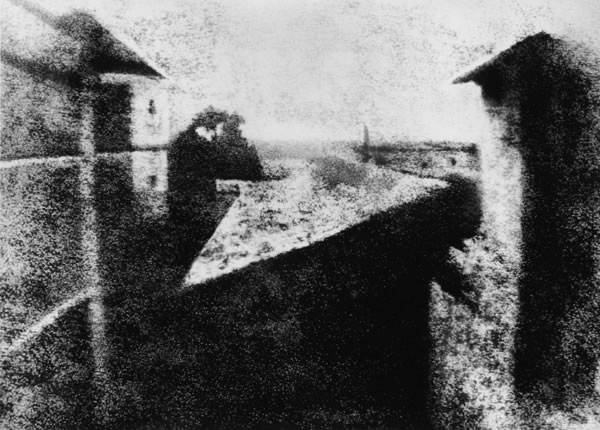
Joseph Nicéphore Niépce
Joseph Nicéphore Niépce, – View from the Window at Le Gras, c. 1826 “The World’s First Photograph” Harry Ransom Humanities Research Center, The University of Texas at Austin
Long before the first public announcements of photographic processes in 1839, Joseph Nicéphore Niépce, a scientifically-minded gentleman living on his country estate near Chalon-sur-Saône, France, began experimenting with photography. Fascinated with the craze for the newly-invented art of lithography which swept over France in 1813, he began his initial experiments by 1816. Unable to draw well, Niépce first placed engravings, made transparent, onto stones coated with light-sensitive varnish of his own composition. These experiments, together with his application of the then-popular optical instrument, the camera obscura, would eventually lead him to the invention of the new medium.
In 1824 Niépce met with some degree of success in copying engravings, but it would be two years later before he utilized pewter plates as the support medium for the process. By the summer of that year, 1826, Niépce was ready. In the window of his upper-story workroom at his country house, Le Gras, he set up a camera obscura, placed within it a polished pewter plate coated with bitumen of Judea (an asphalt derivative of petroleum), and uncapped the lens. After a day-long exposure of eight hours, the plate was removed and the latent image of the view from the window was rendered visible by washing it with a mixture of oil of lavender and white petroleum, which dissolved away the parts of the bitumen that had not been hardened by light. The result was the permanent direct positive picture you see here—a one-of-a-kind photograph on pewter. It renders a view of the outbuildings, trees and landscape as seen from that upstairs window.
An ultimately doomed attempt to interest the Royal Society in his process—which he called “Heliography”—brought Niépce and the first photograph to England in 1827. Upon his return to France later that year, he left his precious artifact with his host, the British botanist Sir Francis Bauer, who dutifully recorded the inventor’s name and additional information on the paper backing of the frame that held the unique plate. Niépce formed a partnership with the French artist, Louis Jacques Mandé Daguerre, in 1829, but produced little more work and died, his contributions chiefly unrecognized, in 1833.
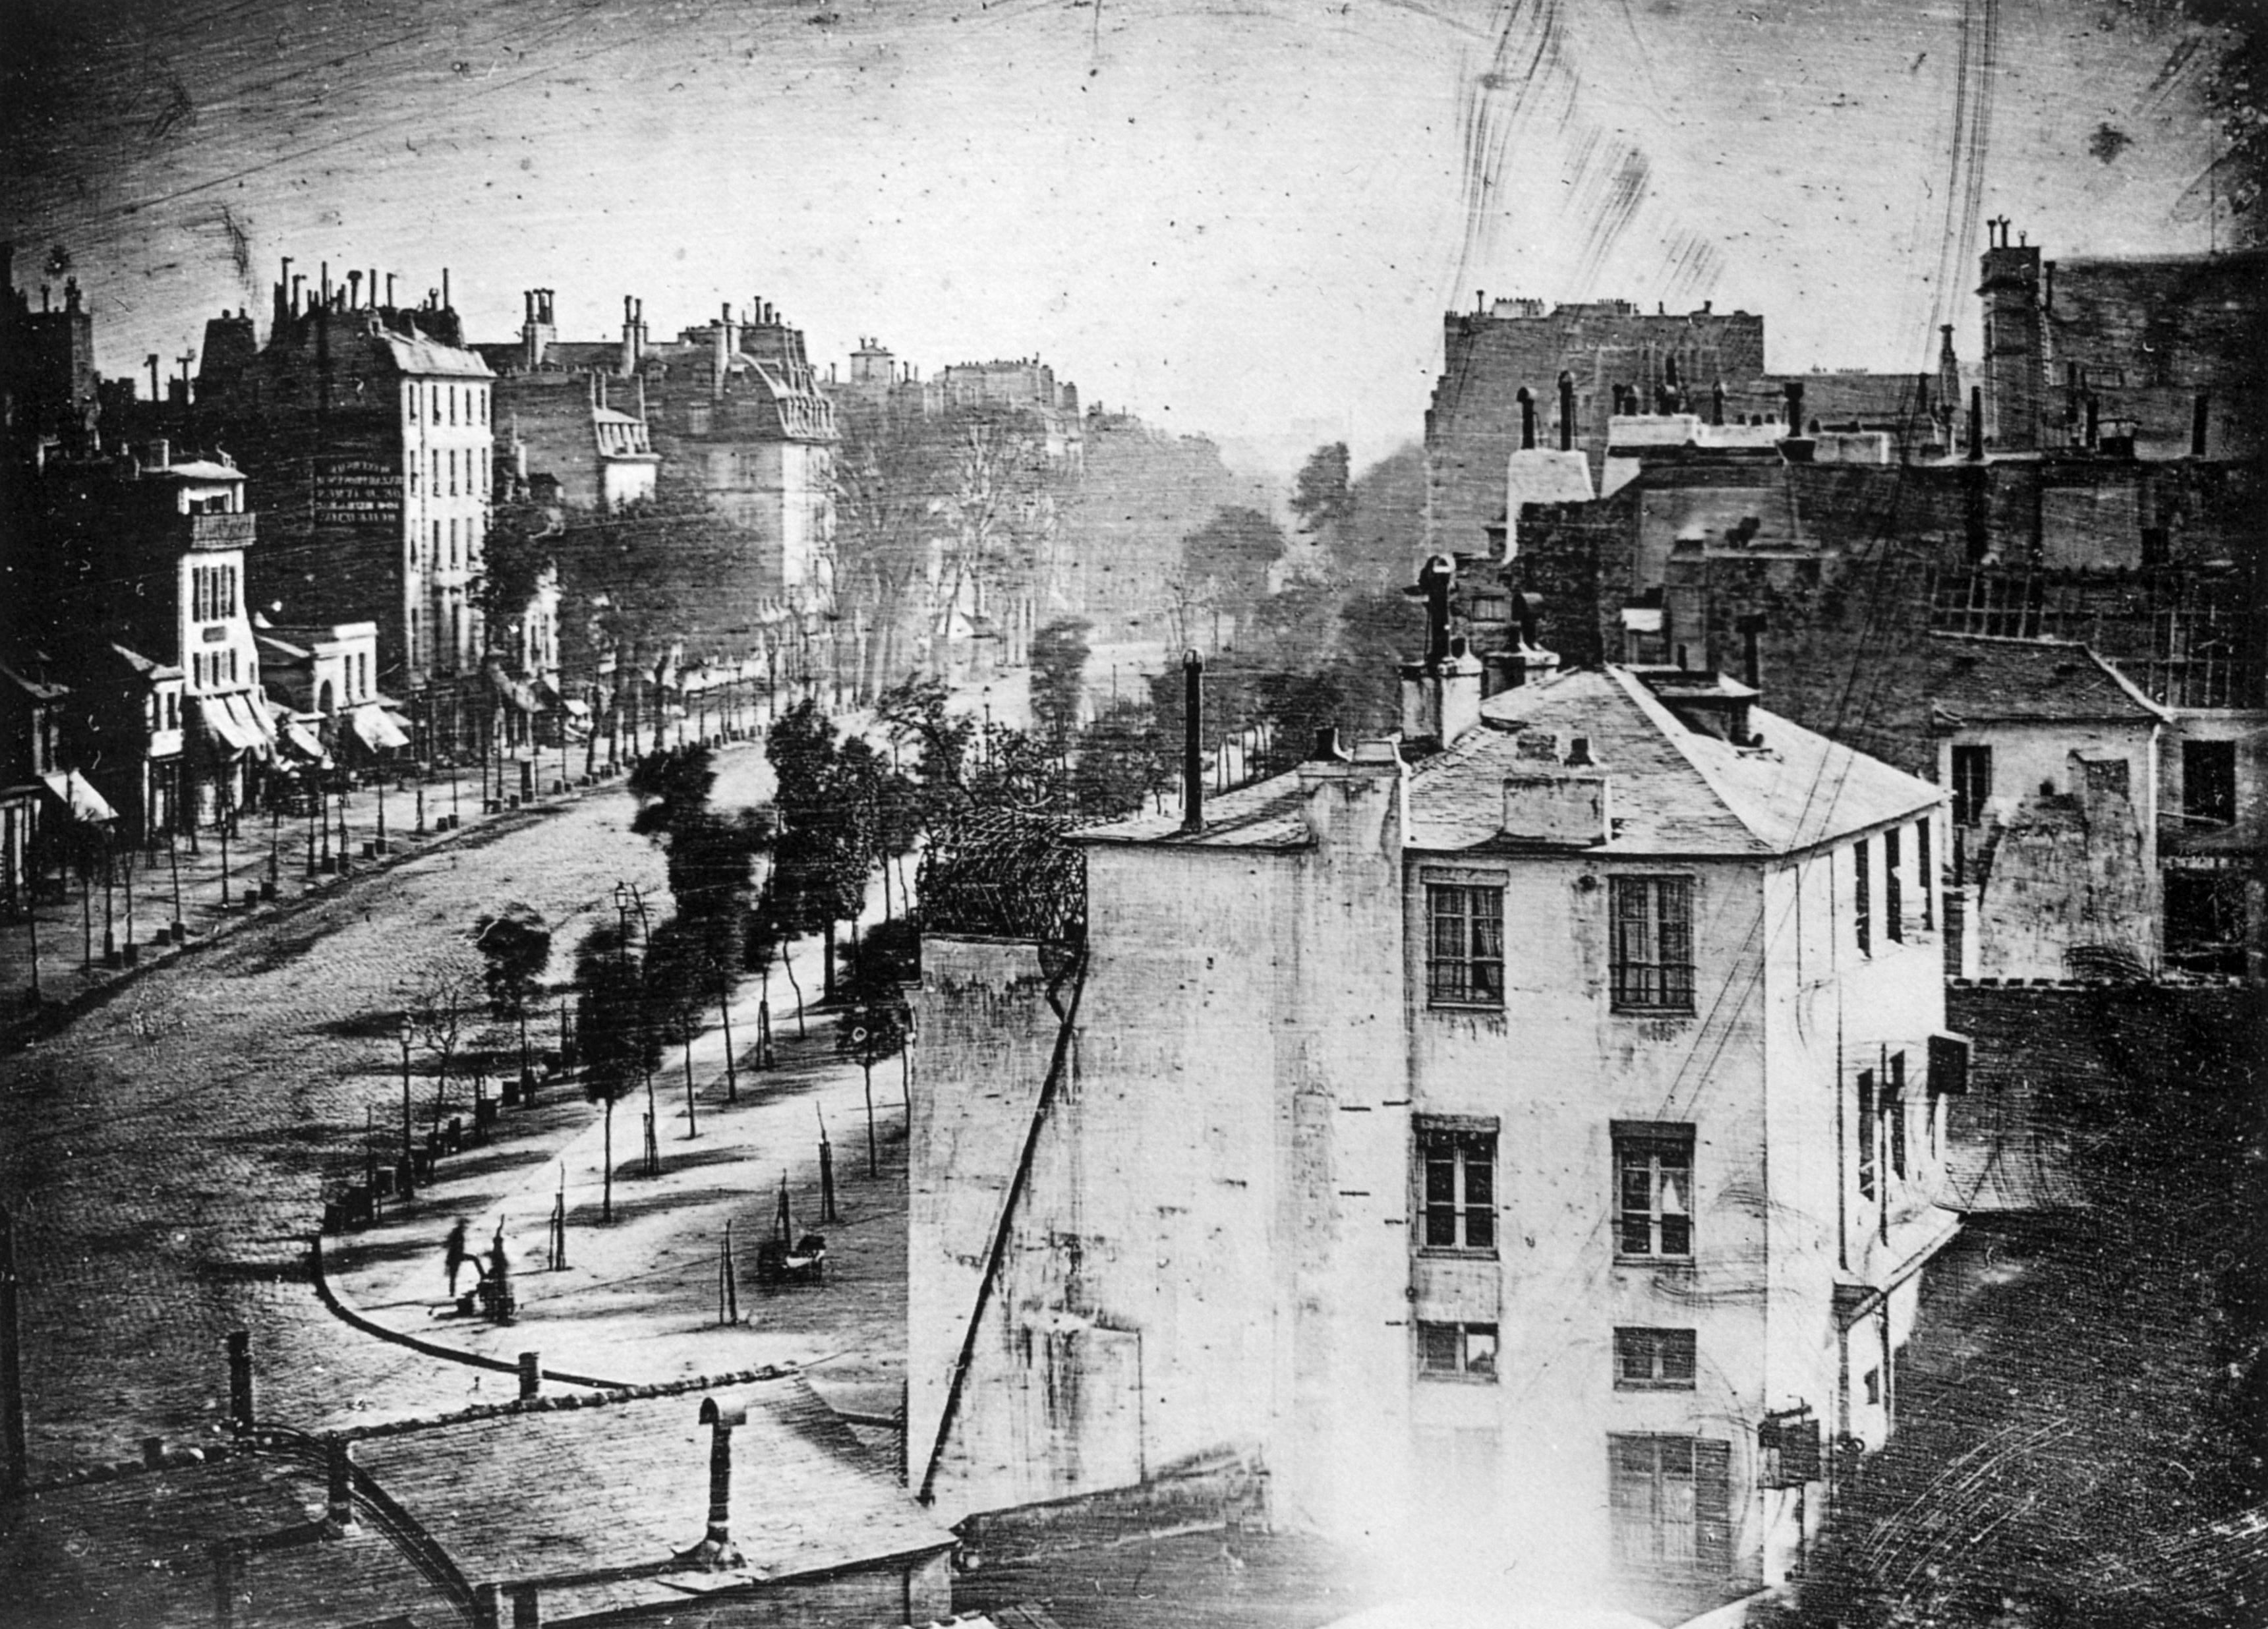
Louis Jacques Mandé Daguerre
View of the Boulevard du Temple, taken by Daguerre in 1838 in Paris, includes the earliest known photograph of a person
In 1829, Daguerre formed a partnership with Nicéphore Niépce, who had been working on the problem of how to make a permanent image using light and chemistry—and who had achieved primitive but real results as early as 1826. By the time Niépce died in 1833, the partners had yet to come up with a practical, reliable process.
Daguerre’s process was revealed on August 19th 1839 and seemed magical. Each daguerreotype is a remarkably detailed, one-of-a-kind photographic image on a highly polished, silver-plated sheet of copper, sensitized with iodine vapors, exposed in a large box camera, developed in mercury fumes, and stabilized (or fixed) with salt water or “hypo” (sodium thiosulfate). Although Daguerre was required to reveal, demonstrate, and publish detailed instructions for the process, he wisely retained the patent on the equipment necessary to practice the new art. From its inset, photography had a dualism about it—as a medium of artistic expression and as a powerful scientific tool—and Daguerre embraced both.
Eadweard Muybridge
In 1878 Muybridge set out to answer the question “When a horse trots or gallops, does it ever become fully airborne?”. Muybridge developed a way to take photos with an exposure lasting a fraction of a second and, with reporters as witnesses, arranged 12 cameras along a track on Stanford’s estate. When the horse ran by it tripped wires connected to the cameras which produced a series of images that showed the horse completely off the ground. This led to the idea that photography could be used to capture truth through technology. Muybridge’s work was an early form of animation that led to the beginnings of the motion picture industry. Muybridge went on to capture more animals and people in his locomotion photos.
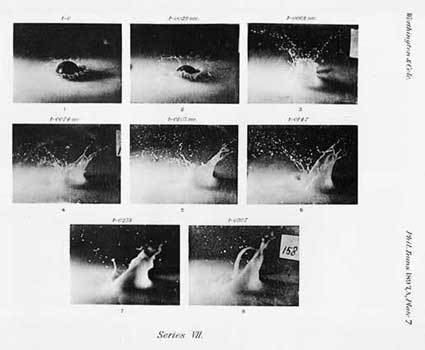
A M Worthington
“The splash of a drop is a transaction which is accomplished in the twinkle of an eye…”
Worthington’s experiments in trying to freeze an image in time using faster shutter speeds are most famously seen in his images of splashes in his fluid mechanics publication of 1908.
Harold Edgerton
Edgerton took the work of Worthington and refined it with his most famous work being that of a milk droplet splashing on to a gloss red plate.
Edgerton synchronized his electronic stroboscope with a special high-speed motion-picture-camera so that with each flash, exactly one frame of film was exposed. The number of flashes per second determined the number of pictures taken.
Motion pictures are normally exposed and projected at 24 frames per second, but when pictures are made at a higher rate and projected at normal speed, the apparent movement is slowed down. Edgerton designed high-speed motion-picture cameras that could expose as many as six thousand to fifteen thousand frames per second. When these films were projected at normal speed (24 frames per second), very high-speed events appeared – and could be studied – in extremely slow motion.
Edgerton’s splash work reminded me of the branding for Crown Paints, which obviously took its inspiration from it.
Philip-Lorca DiCorcia
DiCorcia’s ‘Heads’ is a collection of 17 images taken on the streets of New York in which the subjects were unaware that their photos were being taken. This form of street photography was taken in broad daylight which disguised the strobe lighting used to highlight the passers-by as they went about their daily business. The light was used to illuminate the most minute details of the subjects while the background fades away.
Controversially, one of diCorcia’s subjects sued the artist and his gallery for exhibiting, publishing, and profiting from his picture, arguing that it was taken without his permission and therefore violated his right to privacy (and his religious beliefs). DiCorcia countered that he did not seek consent because, “There is no way the images could have been made with the knowledge and cooperation of the subjects.” The artist ultimately won the case.
Shots
My initial thoughts were to do something with the children’s Lego, maybe dropping it from height and photographing it bouncing as it landed. This would require making noise, and being limited to evenings while the boys were asleep this would prove tricky.
So, plan B was to come back to the water experiments of Worthington and Edgerton. But how to capture an image that I could use with water in the limited free time I had.
As it was the hottest part of the year, the sprinkler was on the garden most evenings and wouldn’t take much to use this as it was the type of sprinkler that sends out pulses of water and I thought I would see if I could capture the individual pulses of water that weren’t normally clearly visible.
I took my camera and my 50mm prime lens and my 70-300mm zoom into the garden and tried my best to dodge the jets of water and take a good shot while keeping my camera dry.
I started with my 50mm and had the camera set to shutter priority with a high speed setting. I had to get quite close to the subject to get a shot. This was the result…
Canon EOS 450D EF50mm/f1.8 1/4000 sec f1.8 ISO 800
This was OK, but not what I had in mind. I wasn’t sure that the 50mm was the right lens for this. So I switched to my zoom.
This lens helped me keep out of the range of the sprinkler! It also gave me a wider field of view. I switched to manual focus here too as I felt it gave me better control over the focal point of the image I wanted to capture. With the high shutter speed, I also set the camera to burst mode to continually shoot when the shutter release is pressed.
I took quite a few shots, most of which weren’t of any use. However, there were a couple that I particularly liked which had some depth of field while focusing on the water pulse…
Canon EOS 450D 70-300mm 1/4000 sec f4.0 ISO 1600
This image was more like what I was looking for and it had captured drops of water in mid-flight with a shallow(ish) depth of field with the evening light glinting on the water pulse.
Close-up of the water drops
I had also captured another similar shot which I felt was better as the depth of field in the water was shallower…
Canon EOS 450D 70-300mm 1/4000 sec f4.0 ISO 800 Close-up of water drops
I feel that this is a stronger image than the first due to the water being clearer with more bokeh.
Reflection
Overall, I think I was initially overthinking this exercise. I think that keeping it simple with the sprinkler gave some good results and I was surprised with the amount of detail I could capture with the camera in-hand. Obviously with the shutter speed being so high, getting light through the lens by upping the ISO affects the clarity of the images when you zoom in or blow them up, so this would be a problem for large format reproduction.
Follow up
I decided to have another go in the garden for some movement capture. I decided to again focus on the front garden, but this time I chose a subject a little more natural – the plentiful supply of bees buzzing around the lavender. Due to their speed, trying to focus on a single bee would prove difficult! I decided to focus on the foliage and try to capture the bees when they were in the vicinity. I set the camera to burst setting with maximum shutter speed and largest ISO and went out to see what I could get. It took a lot of photos with the aim of capturing the bees with their wings frozen in time. This was harder than it looked down to the insect speed being greater than my ageing camera’s speed. However, I did manage to capture one successful image that froze a single bee in time with some amazing detail. After some editing in Lightroom to remove some of the graininess produced by the high ISO and some colour correction I was happy with the result.
Find a subject in front of a background with depth. Take a very close viewpoint and zoom in; you’ll need to be aware of the minimum focusing distance of your lens. Focus on the subject and take a single shot. Then, without changing the focal length or framing, set your focus to infinity and take a second shot.
As you review the two shots, how does the point of focus structure the composition? With a shallow depth of field the point of focus naturally draws the eye, which goes first of all to the part of the image that’s sharp.
Achieving deep depth of field might appear easy compared to the difficulties of managing shallow depth of field. We’re surrounded by images made with devices rather than cameras, whose short focal lengths and small sensors make it hard to achieve anything other than deep depth of field. The trick is to include close foreground elements in focus for an effective deep depth of field image. Foreground detail also helps to balance the frame, which can easily appear empty in wide shots, especially in the lower half. When successful, a close viewpoint together with the dynamic perspective of a wide-angle lens gives the viewer the feeling that they’re almost inside the scene.
Again without moving the camera, select a very small aperture (perhaps one stop above the minimum to avoid diffraction) and find a point of focus that will give you acceptable sharpness throughout the entire field, from foreground to infinity. Take a third shot and add it to the first two to make a set.
The exercise is also a way of thinking about attentional focus. According to some of the most recent thinking in neuroscience, the left hemisphere of the brain attends more to detail while the right hemisphere attends more globally. It’s rather like a woodpecker pecking an insect out of the tree while at the same time keeping an eye out for predators. In photography, you could say that having a good grasp of detail allows you to master the technical aspects while seeing the connections between things makes meaning. You’ll return to this point in Exercise 3.3.
First Shot
I was fortunate enough to stay with friends in an amazing property with large grounds and a walled garden which gave a great backdrop for this exercise. The walled garden had some very decorative doors which I thought would be a good place to to focus my attention.
The first shot I focused on the door’s decorative panel and used a shallow depth of field to blur what was beyond it.
Second image
Not only was I fortunate enough to be in this location, I was also lucky enough to catch one of the resident peacocks (not a woodpecker!) wandering inside the walled garden.
Third image
This was the trickiest of the 3 images and I didn’t really achieve what I set out to achieve with the shot. I did however like the shot and the fact the focal point was just beyond the door but you could still make out the various elements of the composition. I also had to remove a security light above the door in photoshop as it spoiled the feel of the image.
Reflection
Overall. this exercise has illustrated to me how to achieve a good range depth of field, even with a large zoom lens. I didn’t fully understand the brief initially and as a result the third image doesn’t have the depth of field I set out to achieve. I do believe that the 3 images do create a very nice series though.


